Not to brag or anything, but I honestly think I have the cutest little sister in the world!
I mean, just look at those bouncy curls, that beaming smile and those sparkly eyes.
She's Shirley Temple reincarnated!
And it's not just my biased opinion saying that, it's also every adorable little old lady that spots her at the shops. They always go on and on about her curls, but secretly I think they're just extremely jealous that she gets her curls for free and they have to pay for theirs haha.
But enough about my little cutie pie of a model, here is a brand new crochet pattern for you all to enjoy! :)
What You'll Need
5.00mm Crochet Hook
50g of 8ply {DK} Yarn
Scissors
Tapestry/Wool Needle~ Headband ~
Start of by taking your 5.00mm crochet hook and making a Slip Knot, then crochet 75 Chains. You can easily adjust this headband for a child by only chaining 65 chains.
Row 1~ Chain 3, skip 3 chains from your hook, then crochet Double Crochets all across into every chain.
Row 2~ Chain 2, then crochet Half Double Crochets into every stitch across but only through the front loop. {This will create the appearance that the headband is ribbed}
Row 3~ Chain 2, the crochet Half Double Crochets into every stitch across but through both loops.
Row 4~ Chain 2, then crochet Half Double Crochets into every stitch across but only through the front loop.
Row 5~ Chain 2, the crochet Half Double Crochets into every stitch across but through both loops.
Row 7~ Chain 2, the crochet Half Double Crochets into every stitch across but through both loops.
Row 8~ Chain 2, then crochet Half Double Crochets into every stitch across but only through the front loop.
Row 9~ Chain 2, the crochet Half Double Crochets into every stitch across but through both loops.
When you've completed all the rows, connect the two ends of the band together to create a circle and Slip Stitch them together, making sure that the ribbed side is on the inside. Once the band is slip stitched together fold the slip stitched part towards the inside and the ribbed side towards the outside.
Fasten off, and weave in loose ends.
~ Knot ~
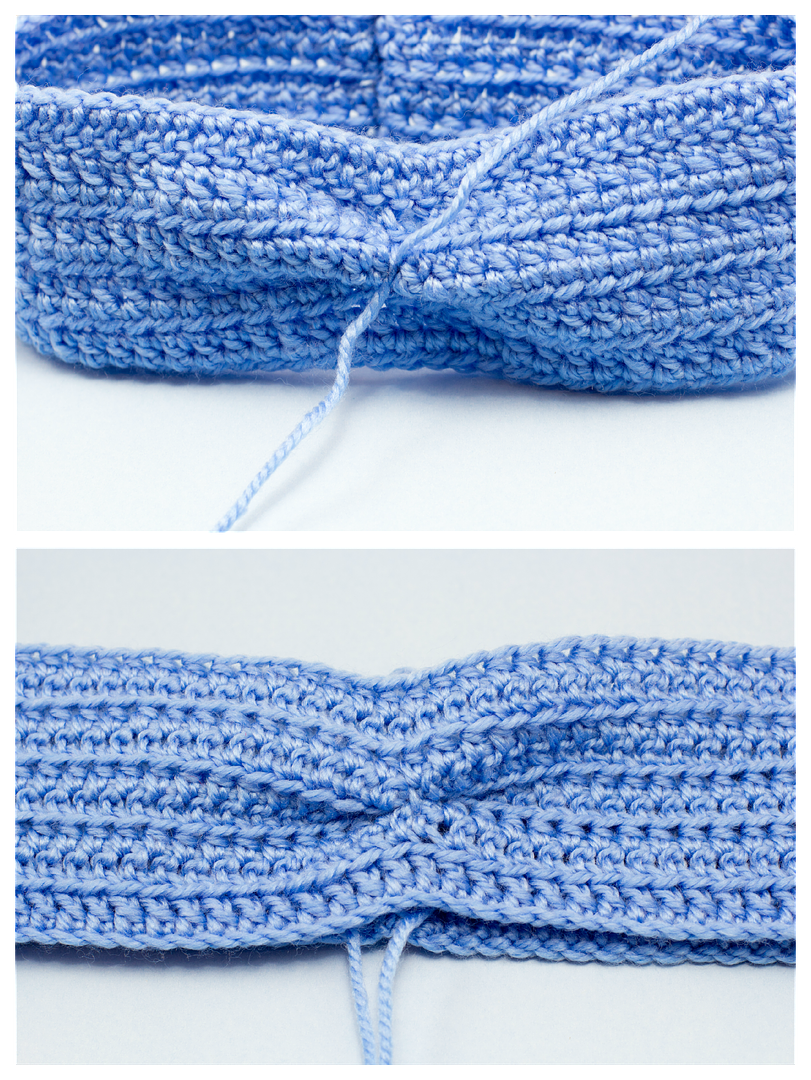
Before you start crocheting your knot you'll need to create a ruched section at the front of your headband. Taking your fingers, pinch together rows 3-6 on the inside of your headband and sew them together. Your knot will later on be sewed over this ruched section. Below are photos of how the ruched section should look on the inside, and outside.
Start of by taking your 5.00mm crochet hook and making a Slip Knot, then crochet 6 Chains.
Row 1~ Chain 2, skip 2 chains from your hook, then crochet Half Double Crochets all across into every chain.
Row 2,3,4,5,6,7,8~ Chain 2, then crochet Half Double Crochets into every stitch across.
Once the strip is finished you will need to wrap it around the ruched area you created previously.
Now taking your tapestry/wool needle sew the two ends of your strip together at the back. Once the knot is sewed onto your headband fasten off, and weave in any loose ends underneath the knot.
And you're done! I hope you all enjoyed this tutorial,
if you have any questions, comment away!
if you have any questions, comment away!
If you did crochet this headband, please post a photo of your creation
onto my Facebook Page, I'd love to see it.
Have a great day crocheting,


